4. Account
The Account Configuration section of the administrative GUI describes how to manually create and manage users and groups. This section contains these entries:
- Groups: used to manage UNIX-style groups on the FreeNAS® system.
- Users: used to manage UNIX-style accounts on the FreeNAS® system.
Each entry is described in more detail in this section.
4.1. Groups
The Groups interface provides management of UNIX-style groups on the FreeNAS® system.
Note
If a directory service is running on the network, it is not necessary to recreate the network’s users or groups. Instead, import the existing account information into FreeNAS®. Refer to Directory Services for details.
This section describes how to create a group and assign user accounts to it. The next section, Users, describes creating user accounts.
Click
Groups → View Groups
to see a screen like
Figure 4.1.1.

Fig. 4.1.1 Group Management
All groups that came with the operating system will be listed. Each group has an entry indicating the group ID, group name, whether or not it is a built-in group which was installed with FreeNAS®, and whether or not the group members are allowed to use sudo. Clicking a group entry causes a Members button to appear. Click the button to view and modify the group membership.
The Add Group button opens the screen shown in Figure 4.1.2. Table 4.1.1 summarizes the available options when creating a group.
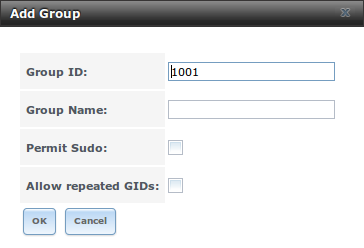
Fig. 4.1.2 Creating a New Group
| Setting | Value | Description |
|---|---|---|
| Group ID | string | the next available group ID will be suggested for you; by convention, UNIX groups containing user accounts have an ID greater than 1000 and groups required by a service have an ID equal to the default port number used by the service (e.g. the sshd group has an ID of 22) |
| Group Name | string | mandatory |
| Permit Sudo | checkbox | if checked, members of the group have permission to use sudo; when using sudo, a user will be prompted for their own password |
| Allow repeated GIDs | checkbox | allows multiple groups to share the same group id (GID); this is useful when a GID is already associated with the UNIX permissions for existing data |
After a group and users are created, users can be made members of a group. Highlight the group where users will be assigned, then click the Members button. Highlight the user in the Member users list (which shows all user accounts on the system) and click >> to move that user to the right frame. The user accounts which appear in the right frame are added as members of the group.
In the example shown in Figure 4.1.3, the data1 group has been created and the user1 user account has been created with a primary group of user1. The Members button for the data1 group has been selected and user1 has been added as a member of the group.
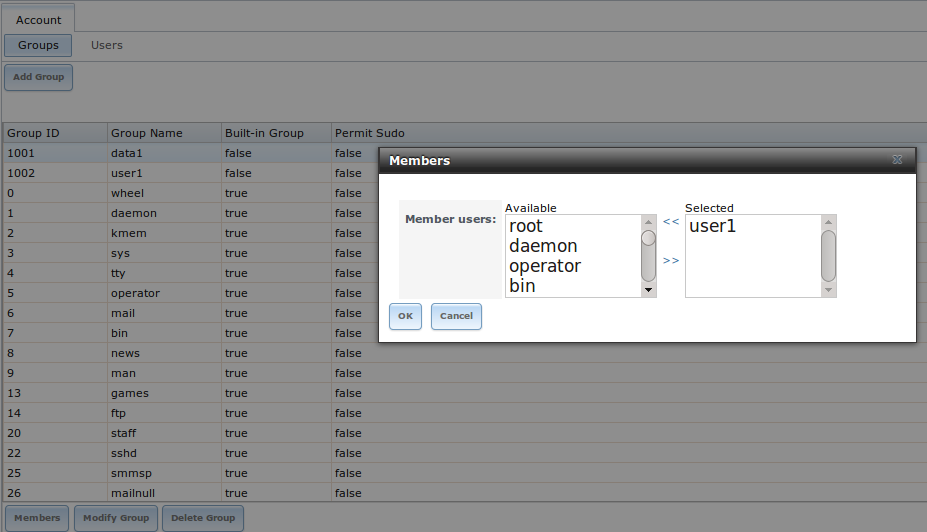
Fig. 4.1.3 Assigning a User to a Group
The Delete Group button deletes a group. The pop-up message asks whether all members of that group should also be deleted. Note that the built-in groups do not provide a Delete Group button.
4.2. Users
FreeNAS® supports users, groups, and permissions, allowing great flexibility in configuring which users have access to the data stored on FreeNAS®. To assign permissions to shares, one of the following must be done:
- Create a guest account that all users will use or create a user account for every user in the network where the name of each account is the same as a logon name used on a computer. For example, if a Windows system has a login name of bobsmith, create a user account with the name bobsmith on FreeNAS®. A common strategy is to create groups with different sets of permissions on shares, then assign users to those groups.
- If your network uses a directory service, import the existing account information using the instructions in Directory Services.
Account → Users → View Users provides a listing
of all of the system accounts that were installed with the FreeNAS®
operating system, as shown in
Figure 4.2.1.

Fig. 4.2.1 Managing User Accounts
Each account entry indicates the user ID, username, primary group ID, home directory, default shell, full name, whether it is a built-in user that came with the FreeNAS® installation, the email address, whether logins are disabled, whether the user account is locked, whether the user is allowed to use sudo, and if the user connects from a Windows 8 or higher system. To reorder the list, click the desired column name. An arrow indicates which column controls the view sort order. Click the arrow to reverse the sort order.
Click a user account to cause these buttons to appear:
- Modify User: used to modify the account’s settings, as listed in Table 4.2.1.
- Change E-mail: used to change the email address associated with the account.
Note
It is important to set the email address for the built-in root user account as important system messages are sent to the root user. For security reasons, password logins are disabled for the root account and changing this setting is highly discouraged.
Except for the root user, the accounts that come with FreeNAS® are system accounts. Each system account is used by a service and should not be used as a login account. For this reason, the default shell on system accounts is nologin(8). For security reasons, and to prevent breakage of system services, do not modify the system accounts.
The Add User button opens the screen shown in
Figure 4.2.2.
Some settings are only available in Advanced Mode. To see
these settings, either click the Advanced Mode button or
configure the system to always display these settings by checking the
box Show advanced fields by default in
System → Advanced.
Table 4.2.1
summarizes the options which are available when user accounts are
created or modified.
Warning
When using Active Directory, Windows user passwords must be set from within Windows.

Fig. 4.2.2 Adding or Editing a User Account
| Setting | Value | Advanced Mode | Description |
|---|---|---|---|
| User ID | integer | grayed out if user already created; when creating an account, the next numeric ID will be suggested; by convention, user accounts have an ID greater than 1000 and system accounts have an ID equal to the default port number used by the service | |
| Username | string | grayed out if user already created; maximum 16 characters though a maximum of 8 is recommended for interoperability; cannot begin
with a hyphen, if a $ is used it can only be the last character, and it cannot contain a space, tab, or the characters
, : + & # % ^ & ( ) ! @ ~ * ? < > = |
|
| Create a new primary group | checkbox | by default, a primary group with the same name as the user will be created; uncheck this box to select a different primary group name | |
| Primary Group | drop-down menu | must uncheck Create a new primary group to access this menu; for security reasons, FreeBSD will not give a user su permissions if wheel is their primary group; to give a user su access, add them to the wheel group in Auxiliary groups | |
| Create Home Directory In | browse button | browse to the name of an existing volume or dataset that the user will be assigned permission to access | |
| Home Directory Mode | checkboxes | ✓ | sets default Unix permissions of user’s home directory; read-only for built-in users |
| Shell | drop-down menu | select shell to use for local and SSH logins; see Table 4.2.2 for an overview of available shells | |
| Full Name | string | mandatory, may contain spaces | |
| string | email address associated with the account | ||
| Password | string | mandatory unless check box Disable password login; cannot contain a ? | |
| Password confirmation | string | must match the value of Password | |
| Disable password login | checkbox | when checked, disables password logins and authentication to SMB shares; to undo this setting, set a password for the user using the Modify User button for the user in View Users; checking this box grays out Lock user and Permit Sudo, which are mutually exclusive | |
| Lock user | checkbox | a checked box prevents user from logging in until the account is unlocked (box is unchecked); checking this box will gray out Disable password login which is mutually exclusive | |
| Permit Sudo | checkbox | if checked, members of the group have permission to use sudo; when using sudo, a user will be prompted for their own password | |
| Microsoft Account | checkbox | check this box if the user will be connecting from a Windows 8 or higher system | |
| SSH Public Key | string | paste the user’s public SSH key to be used for key-based authentication (do not paste the private key!) | |
| Auxiliary groups | mouse selection | highlight the groups to which the user is to be added; click the >> button to add the user to the highlighted groups |
Note
Some fields cannot be changed for built-in users and will be grayed out.
| Shell | Description |
|---|---|
| netcli.sh | user can access the Console Setup menu shown in Figure 3.1, even if it is
disabled in System → Advanced → Enable Console Menu |
| csh | C shell |
| sh | Bourne shell |
| tcsh | Enhanced C shell |
| nologin | use when creating a system account or to create a user account that can authenticate with shares but which cannot login to the FreeNAS system using ssh |
| bash | Bourne Again shell |
| ksh93 | Korn shell |
| mksh | mirBSD Korn shell |
| rbash | Restricted bash |
| rzsh | Restricted zsh |
| scponly | select scponly to restrict the user’s SSH usage to only the scp and sftp commands |
| zsh | Z shell |
| git-shell | restricted git shell |
Built-in user accounts needed by the system cannot be removed. A Remove User button appears for custom users that have been added by the system administrator. If the user to be removed is the last user in a custom group, an option is presented to delete the group as well.