2. Installing and Upgrading
Please note that the FreeNAS® operating system must be installed on a separate device from the drives which hold the storage data. In other words, with only one disk drive, the FreeNAS® graphical interface is available, but there is no place to store any data. And storing data is, after all, the whole point of a NAS system. Home users experimenting with FreeNAS® can install FreeNAS® on an inexpensive USB thumb drive and use the computer’s disks for storage.
This section describes:
- Getting FreeNAS®
- Preparing the Media
- Performing the Installation
- Installation Troubleshooting
- Upgrading
- Virtualization
2.1. Getting FreeNAS®
The latest STABLE version of FreeNAS® 9.10.2 can be downloaded from http://download.freenas.org/.
Note
FreeNAS® requires 64-bit hardware.
The download page contains these types of files:
- .iso: this is a bootable installer that can be written to either a CD or USB flash as described in Preparing the Media.
- .GUI_Upgrade.txz: this is a compressed firmware upgrade image. To upgrade FreeNAS®, download this file and see the section on Upgrading.
Each file has an associated sha256.txt file which should be
used to verify the integrity of the downloaded file. The command to
verify the checksum varies by operating system:
- on a BSD system use the command
sha256 name_of_file - on a Linux system use the command
sha256sum name_of_file - on a Mac system use the command
shasum -a 256 name_of_file - Windows or Mac users can install additional utilities like HashCalc or HashTab
The value produced by running the command must match the value shown
in the sha256.txt file. Checksum values that do not match
indicate a corrupted installer file that should not be used.
2.2. Preparing the Media
The FreeNAS® installer can run from either a CD or a USB memory stick.
A CD burning utility is needed to write the .iso file to a
CD.
The .iso file can also be written to a USB memory stick or
Compact Flash card. The method used to write the file depends on the
operating system. Examples for several common operating systems are
shown below.
Note
To install from a USB stick to another USB stick, two USB ports are needed, each with an inserted USB device. One USB stick contains the installer. The other USB stick is the destination for the FreeNAS® installation. Take care to select the correct USB device for the FreeNAS® installation. It is not possible to install FreeNAS® onto the same USB stick containing the installer. After installation, remove the installer USB stick. It might also be necessary to adjust the BIOS configuration to boot from the new FreeNAS® USB stick.
Make sure that the boot device order in the BIOS is set to boot from the device containing the FreeNAS® installer media, then boot the system to start the installation.
2.2.1. On FreeBSD or Linux
On a FreeBSD or Linux system, the dd command can be used to
write the .iso file to an inserted USB thumb drive or Compact
Flash device.
Example: Writing the .iso file to a USB Thumb Drive
demonstrates writing the image to the first USB device (/dev/da0) on
a FreeBSD system. Substitute the filename of the .iso file and
the device name representing the device to write to on your system.
Warning
The dd command is very powerful and can
destroy any existing data on the specified device. Make
absolutely sure of the device name to write to and do not
mistype the device name when using dd! If you are
uncomfortable using this command, write the .iso file to a
CD instead.
Writing the .iso file to a USB Thumb Drive
dd if=FreeNAS-9.10-RELEASE-x64.iso of=/dev/da0 bs=64k
6117+0 records in
6117+0 records out
400883712 bytes transferred in 88.706398 secs (4519220 bytes/sec)
When using the dd command:
- if= refers to the input file, or the name of the file to write to the device.
- of= refers to the output file; in this case, the device name of
the flash card or removable USB drive. Note that USB device numbers
are dynamic, and the target device might be da1 or da2 or
another name depending on which devices are attached. Before
attaching the target USB drive, use ls /dev/da*. Then
attach the target USB drive, wait ten seconds, and run ls
/dev/da* again to see the new device name and number of the target
USB drive. On Linux, use
/dev/sdX, where X refers to the letter of the USB device. - bs= refers to the block size, the amount of data to write at a time. The larger 64K block size shown here helps speed up writes to the USB drive.
2.2.2. On Windows
Microsoft provides the USB/DVD Download Tool to create a USB bootable
image from an .iso file. Follow
these instructions,
but enter the name of the downloaded .iso into the
SOURCE FILE box.
Image Writer and Rufus are alternate programs for writing images to USB sticks on a computer running Windows.
2.2.3. On OS X
Insert the USB thumb drive. In the Finder, go to
Applications → Utilities → Disk Utility.
Unmount any mounted partitions on the USB thumb drive. Check that the
USB thumb drive has only one partition, or partition table errors will
be shown on boot. If needed, use Disk Utility to set up one partition
on the USB drive. Selecting Free space when creating the
partition works fine.
Determine the device name of the inserted USB thumb drive. From TERMINAL, navigate to the Desktop, then type this command:
diskutil list
/dev/disk0

#:     TYPE NAME               SIZE            IDENTIFIER
0:     GUID_partition_scheme   *500.1 GB       disk0
1:     EFI                     209.7 MB        disk0s1
2:     Apple_HFS Macintosh HD  499.2 GB        disk0s2
3:     Apple_Boot Recovery HD  650.0 MB        disk0s3

/dev/disk1
#:     TYPE NAME               SIZE            IDENTIFIER
0:     FDisk_partition_scheme  *8.0 GB         disk1
1:     DOS_FAT_32 UNTITLED     8.0 GB          disk1s1
This shows which devices are available to the system. Locate the
target USB stick and record the path. If you are not sure which path
is the correct one for the USB stick, remove the device, run the
command again, and compare the difference. Once sure of the device
name, navigate to the Desktop from TERMINAL, unmount the USB stick,
and use the dd command to write the image to the USB stick.
In Example: Using dd on an OS X System,
the USB thumb drive is /dev/disk1, which is first unmounted.
The dd command uses /dev/rdisk1 (note the extra
r) to write to the raw device, which is faster. When running these
commands, substitute the name of the installation file and the correct
path to the USB thumb drive.
Example: Using dd on an OS X System
diskutil unmountDisk /dev/disk1
Unmount of all volumes on disk1 was successful

dd if=FreeNAS-9.10-RELEASE-x64.iso of=/dev/rdisk1 bs=64k
Note
If the error “Resource busy” is shown when the
dd command is run, go to
Applications → Utilities → Disk Utility,
find the USB thumb drive, and click on its partitions to make sure
all of them are unmounted. If the error
“dd: /dev/disk1: Permission denied” is shown, run the dd
command by typing
sudo dd if=FreeNAS-9.10-RELEASE-x64.iso of=/dev/rdisk1 bs=64k.
This will prompt for your password.
The dd command can take some minutes to complete. Wait until the prompt returns and a message is displayed with information about how long it took to write the image to the USB drive.
2.3. Performing the Installation
With the installation media inserted, boot the system from that media. The FreeNAS® installer GRUB menu is displayed as is shown in Figure 2.3.1.
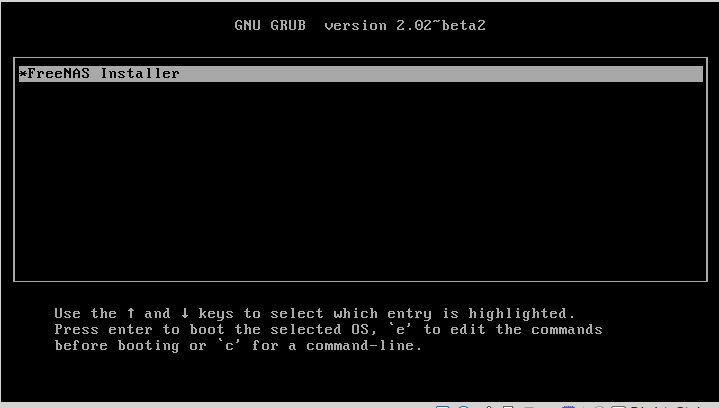
Fig. 2.3.1 Grub Menu
Note
If the installer does not boot, verify that the installation
device is listed first in the boot order in the BIOS. When booting
from a CD, some motherboards may require connecting the CD device
to SATA0 (the first connector) to boot from CD. If the installer
stalls during bootup, double-check the SHA256 hash of the
.iso file. If the hash does not match, re-download the
file. If the hash is correct, burn the CD again at a lower speed or
write the file to a different USB stick.
Wait for the menu to time out or press Enter to boot into the
installer. After the media boots, the console setup menu is displayed
as shown in
Figure 2.3.2.
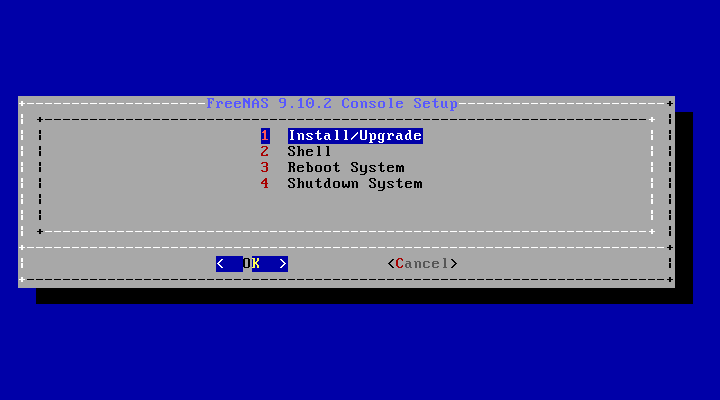
Fig. 2.3.2 Console Setup
Press Enter to select the default option,
1 Install/Upgrade. The next menu, shown in
Figure 2.3.3,
lists all available drives. This includes any inserted USB thumb
drives, which have names beginning with da.
In this example, the user is performing a test installation using VirtualBox and has created a 16 GB virtual disk to hold the operating system.
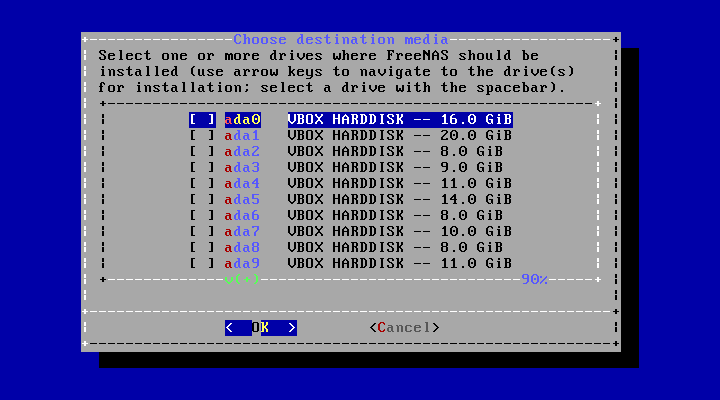
Fig. 2.3.3 Selecting the Install Drive
Use the arrow keys to highlight the destination USB drive, SSD,
DOM (Disk on Module), Compact Flash device, or virtual disk. Press the
spacebar to select it. To mirror the boot device, move to the
second device and press spacebar to select it also. After
making these selections, press Enter. The warning shown in
Figure 2.3.4
is displayed, a reminder not to install the operating system on a
drive that is meant for storage. Press Enter to continue on to
the screen shown in
Figure 2.3.6.
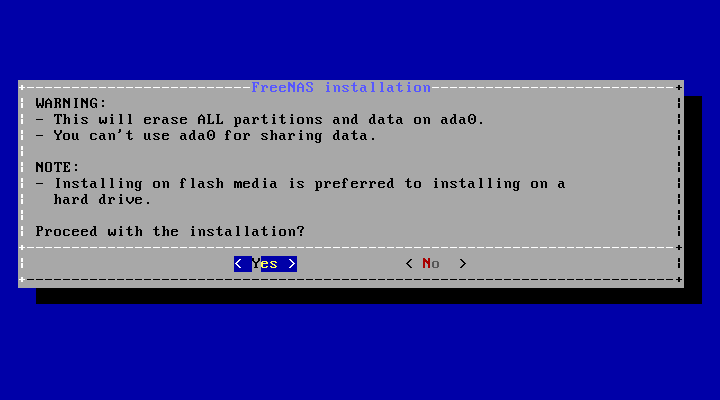
Fig. 2.3.4 Installation Warning
Note
A minimum of 8 GB of space on the boot device is required. However, 32 GB is recommended to provide room for future additions and boot environments. When using mirrored boot devices, it is best to use devices of the same size. If the device sizes are different, the mirror is limited to the size of the smaller device.
The installer recognizes existing installations of previous versions
of FreeNAS® 8.x or 9.x. When an existing installation is present, the
menu shown in
Figure 2.3.5
is displayed. To overwrite an existing installation, use the arrows
to move to Fresh Install and press Enter twice to
continue to the screen shown in
Figure 2.3.6.
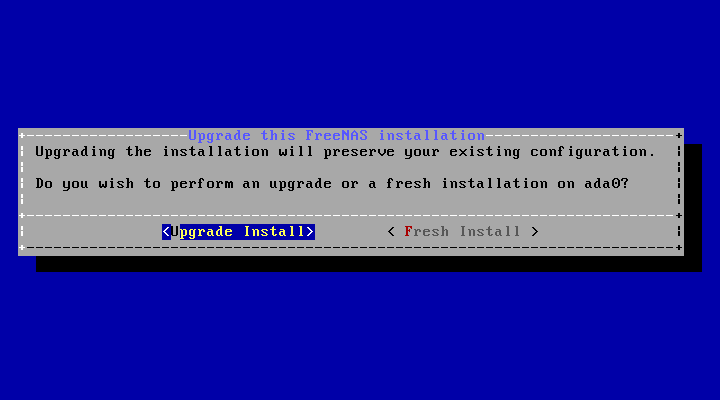
Fig. 2.3.5 Performing a Fresh Install
The screen shown in Figure 2.3.6 prompts for the root password which is used to log in to the administrative graphical interface.
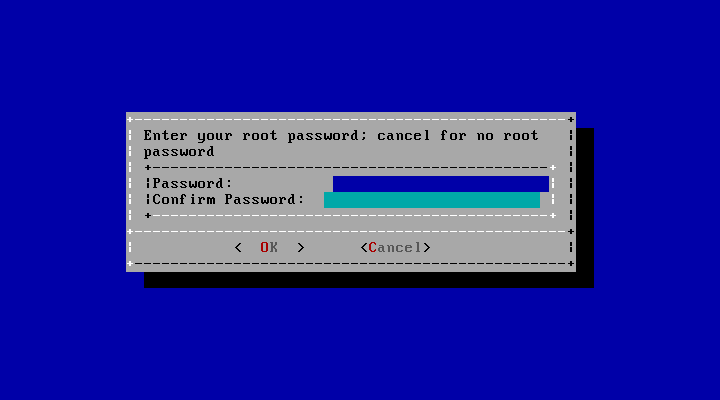
Fig. 2.3.6 Set the Root Password
Setting a password is mandatory and the password cannot be blank.
Since this password provides access to the administrative GUI, it
should be hard to guess. Enter the password, press the down arrow key,
and confirm the password. Then press Enter to continue with the
installation.
Note
For security reasons, the SSH service and root SSH logins are disabled by default. Unless these are set, the only way to access a shell as root is to gain physical access to the console menu or to access the web shell within the administrative GUI. This means that the FreeNAS® system should be kept physically secure and that the administrative GUI should be behind a properly configured firewall and protected by a secure password.
FreeNAS® can be configured to boot with the standard BIOS boot mechanism or UEFI booting as shown Figure 2.3.7. BIOS booting is recommended for legacy and enterprise hardware. UEFI is used on newer consumer motherboards.
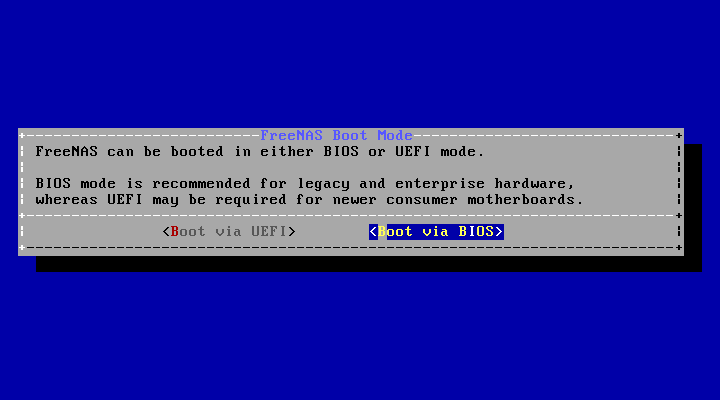
Fig. 2.3.7 Choose UEFI or BIOS Booting
Note
Most UEFI systems can also boot in BIOS mode if CSM (Compatibility Support Module) is enabled in the UEFI setup screens.
The message in Figure 2.3.8 is shown after the installation is complete.
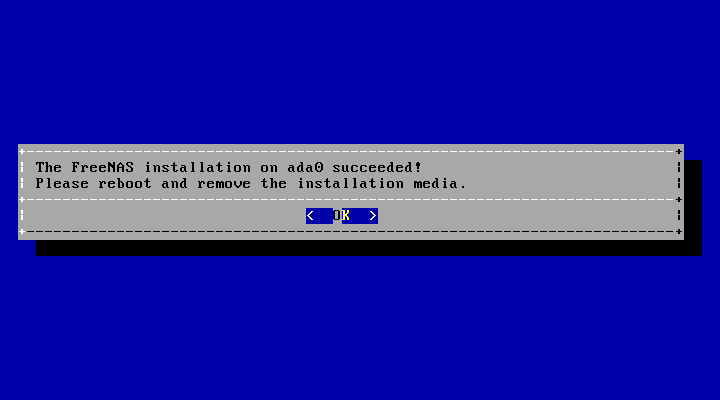
Fig. 2.3.8 Installation Complete
Press Enter to return to the first menu, shown in
Figure 2.3.1.
Highlight 3 Reboot System and press Enter. If
booting from CD, remove the CDROM. As the system reboots, make sure
that the device where FreeNAS® was installed is listed as the first
boot entry in the BIOS so the system will boot from it. FreeNAS® boots
into the Console Setup menu described in
Booting.
2.4. Installation Troubleshooting
If the system does not boot into FreeNAS®, there are several things that can be checked to resolve the situation.
Check the system BIOS and see if there is an option to change the USB emulation from CD/DVD/floppy to hard drive. If it still will not boot, check to see if the card/drive is UDMA compliant.
If the system BIOS does not support EFI with BIOS emulation, see if it has an option to boot using legacy BIOS mode.
When the system starts to boot but hangs with this repeated error message:
run_interrupt_driven_hooks: still waiting after 60 seconds for xpt_config
go into the system BIOS and look for an onboard device configuration for a 1394 Controller. If present, disable that device and try booting again.
If the system starts to boot but hangs at a mountroot> prompt, follow the instructions in Workaround/Semi-Fix for Mountroot Issues with 9.3.
If the burned image fails to boot and the image was burned using a Windows system, wipe the USB stick before trying a second burn using a utility such as Active@ KillDisk. Otherwise, the second burn attempt will fail as Windows does not understand the partition which was written from the image file. Be very careful to specify the correct USB stick when using a wipe utility!
2.5. Upgrading
FreeNAS® provides flexibility for keeping the operating system up-to-date:
- Upgrades to major releases, for example from version 9.3 to 9.10, can still be performed using either an ISO or the graphical administrative interface. Unless the Release Notes for the new major release indicate that the current version requires an ISO upgrade, either upgrade method can be used.
- Minor releases have been replaced with signed updates. This means that it is not necessary to wait for a minor release to update the system with a system update or newer versions of drivers and features. It is also no longer necessary to manually download an upgrade file and its associated checksum to update the system.
- The updater automatically creates a boot environment, making updates a low-risk operation. Boot environments provide the option to return to the previous version of the operating system by rebooting the system and selecting the previous boot environment from the boot menu.
This section describes how to perform an upgrade from an earlier version of FreeNAS® to 9.10.2. After 9.10.2 has been installed, use the instructions in Update to keep the system updated.
2.5.1. Caveats:
Be aware of these caveats before attempting an upgrade to 9.10.2:
- Upgrades from FreeNAS® 0.7x are not supported. The system has no way to import configuration settings from 0.7x versions of FreeNAS®. The configuration must be manually recreated. If supported, the FreeNAS® 0.7x volumes or disks must be manually imported.
- Upgrades on 32-bit hardware are not supported. However, if the system is currently running a 32-bit version of FreeNAS® and the hardware supports 64-bit, the system can be upgraded. Any archived reporting graphs will be lost during the upgrade.
- UFS is no longer supported. If your data currently resides on one UFS-formatted disk, you will need to create a ZFS volume using other disks after the upgrade, then use the instructions in Import Disk to mount the UFS-formatted disk to copy the data to the ZFS volume. With only one disk, back up its data to another system or media before the upgrade, format the disk as ZFS after the upgrade, then restore the backup. If the data currently resides on a UFS RAID of disks, you will not be able to import that data to the ZFS volume. Instead, back up that data before the upgrade, create a ZFS volume after the upgrade, then restore the data from backup.
- The Wizard will not recognize an encrypted ZFS pool. If the ZFS pool is GELI-encrypted and the Wizard starts after the upgrade, cancel the Wizard and use the instructions in Importing an Encrypted Pool to import the encrypted volume. The Wizard can be run afterwards to use it for post-configuration, and it will recognize that the volume has been imported and will not prompt to reformat the disks.
- DO NOT upgrade the ZFS pool unless you are absolutely sure that you will never want to go back to the previous version. For this reason, the update process will not automatically upgrade the ZFS pool, though the Alert system shows when newer feature flags are available for the pool. Unless you need a new feature flag, it is safe to leave the ZFS pool at its current version and uncheck the alert. If you do decide to upgrade the pool, you will not be able to boot into a previous version that does not support the newer feature flags.
- The mps driver for 6 G Avago SAS HBAs is version 21, which requires phase 20 firmware on the controller and the mpr driver for 12 G Avago SAS HBAs is version 13 which requires P12 firmware. It is recommended to upgrade the firmware before installing FreeNAS® or immediately after upgrading FreeNAS®, using the instructions in Alert. Running older firmware can cause many woes, including the failure to probe all of the attached disks, which can lead to degraded or unavailable arrays. While you can mismatch your firmware version with a higher version and things will “probably still work”, there are no guarantees as that driver and firmware combination is untested.
- If upgrading from 9.3.x, please read the FAQ: Upgrading from 9.3 to 9.10 first.
2.5.2. Initial Preparation
Before upgrading the operating system, perform the following steps:
- Back up the FreeNAS® configuration in
System → General → Save Config. - If any volumes are encrypted, make sure that you have set the passphrase and have a copy of the encryption key and the latest recovery key. After the upgrade is complete, use the instructions in Importing an Encrypted Pool to import the encrypted volume.
- Warn users that the FreeNAS® shares will be unavailable during the upgrade; you should schedule the upgrade for a time that will least impact users.
- Stop all services in
Services → Control Services.
2.5.3. Upgrading Using the ISO
To perform an upgrade using this method,
download
the .iso to the computer that will be used to prepare the
installation media. Burn the downloaded .iso file to a CD or
USB thumb drive using the instructions in
Preparing the Media.
Insert the prepared media into the system and boot from it. After the
media finishes booting into the installation menu, press Enter
to select the default option of 1 Install/Upgrade. The
installer presents a screen showing all available drives.
Warning
All drives are shown, including boot drives and storage
drives. Only choose boot drives when upgrading. Choosing the wrong
drives to upgrade or install will cause loss of data. If unsure
about which drives contain the FreeNAS® operating system, reboot and
remove the install media. In the FreeNAS® GUI, use
System → Boot
to identify the boot drives. More than one drive is shown when a
mirror has been used.
Move to the drive where FreeNAS® is installed and press the
Spacebar to mark it with a star. If a mirror has been used for
the operating system, mark all of the drives where the FreeNAS®
operating system is installed. Press Enter when done.
The installer recognizes earlier versions of FreeNAS® installed on the boot drive or drives and presents the message shown in Figure 2.5.1.
Fig. 2.5.1 Upgrading a FreeNAS® Installation
Note
If you choose a Fresh Install, the backup of
your configuration data must be restored using
System → General → Upload Config
after booting into the new operating system.
To perform an upgrade, press Enter to accept the default of
Upgrade Install. Again, the installer will remind you that
the operating system should be installed on a disk that is not used
for storage.
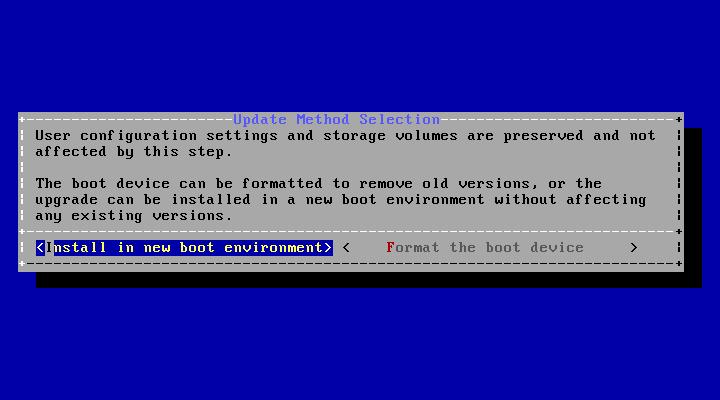
Fig. 2.5.2 Install in New Boot Environment or Format
The updated system can be installed in a new boot environment,
or the entire boot device can be formatted to start fresh. Installing
into a new boot environment preserves the old code, allowing a
roll-back to previous versions if necessary. Formatting the boot
device is usually not necessary but can reclaim space. User data and
settings are preserved when installing to a new boot environment and
also when formatting the boot device. Move the highlight to one of the
options and press Enter to start the upgrade.
The installer unpacks the new image and displays the menu shown in Figure 2.5.3. The database file that is preserved and migrated contains your FreeNAS® configuration settings.
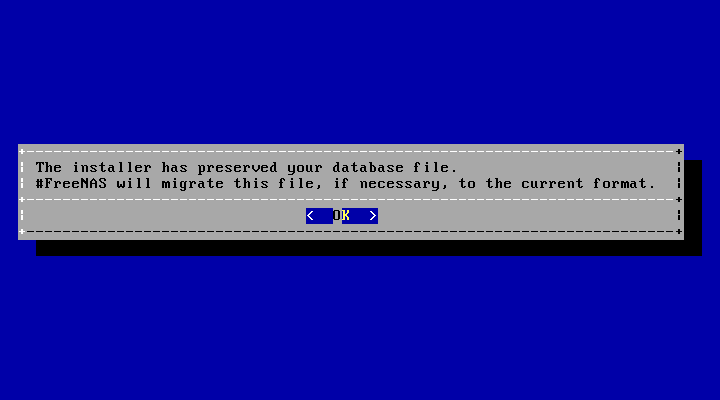
Fig. 2.5.3 Preserve and Migrate Settings
Press Enter. FreeNAS® indicates that the upgrade is complete and
a reboot is required. Press OK, highlight
3 Reboot System, then press Enter to reboot the
system. If the upgrade installer was booted from CD, remove the CD.
During the reboot there may be a conversion of the previous
configuration database to the new version of the database. This
happens during the “Applying database schema changes” line in the
reboot cycle. This conversion can take a long time to finish,
sometimes fifteen minutes or more, and might have to reboot the system
again afterwards. Please be patient and the system will start
normally. If database errors are shown but the graphical
administrative interface is accessible, go to
Settings → General
and use the Upload Config button to upload the
configuration that you saved before starting the upgrade.
2.5.4. Upgrading From the GUI
To perform an upgrade using this method, go to
System → Update.
After the update is complete, you will temporarily lose your connection as the FreeNAS® system reboots into the new version of the operating system. The FreeNAS® system will normally receive the same IP address from the DHCP server. Refresh your browser after a moment to see if you can access the system.
2.5.5. If Something Goes Wrong
If an update fails, an alert is issued and the details are written to
/data/update.failed.
To return to a previous version of the operating system, physical or IPMI access to the FreeNAS® console is needed. Reboot the system and watch for the boot menu. In the example shown in Figure 2.5.4, the first boot menu entry, FreeNAS (default), refers to the initial installation, before the update was applied. The second boot entry, FreeNAS-1415259326, refers to the current version of the operating system, after the update was applied. This second entry is highlighted and begins with a star, indicating that this is the environment the system will boot unless another entry is manually selected. Both entries include a date and timestamp showing when that boot environment was created.
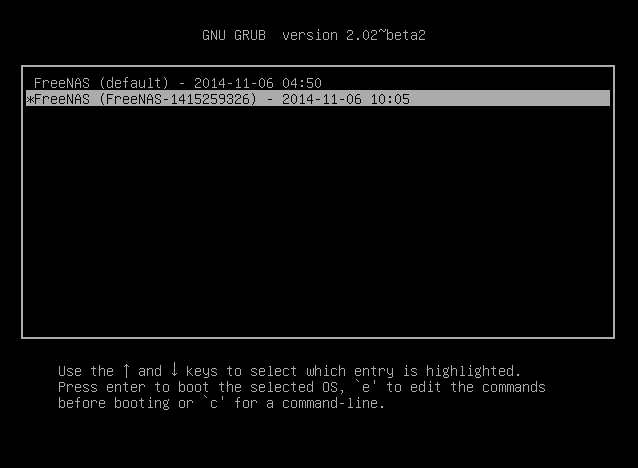
Fig. 2.5.4 Boot Menu
To boot into the previous version of the operating system, use the up
or down arrow to select it and press Enter.
If a boot device fails and the system no longer boots, don’t panic. The data is still on your disks and you still have a copy of your saved configuration. You can always:
- Perform a fresh installation on a new boot device.
- Import your volumes in
Storage → Auto Import Volume. - Restore the configuration in
System → General → Upload Config.
Note
You cannot restore a saved configuration which is newer than the installed version. For example, if you reboot into an older version of the operating system, you cannot restore a configuration that was created in a later version.
2.5.6. Upgrading a ZFS Pool
In FreeNAS®, ZFS pools can be upgraded from the graphical administrative interface.
Before upgrading an existing ZFS pool, be aware of these caveats first:
- the pool upgrade is a one-way street, meaning that if you change your mind you cannot go back to an earlier ZFS version or downgrade to an earlier version of the software that does not support those feature flags.
- before performing any operation that may affect the data on a storage disk, always back up your data first and verify the integrity of the backup. While it is unlikely that the pool upgrade will affect the data, it is always better to be safe than sorry.
- upgrading a ZFS pool is optional. It is not necessary to upgrade the pool if you do not need newer feature flags or if you want to keep the possibility of reverting to an earlier version of FreeNAS® or repurposing the disks in another operating system that supports ZFS. If you decide to upgrade the pool to the latest feature flags, it will not be possible to import that pool into another operating system that does not yet support those feature flags.
To perform the ZFS pool upgrade, go to
Storage → Volumes → View Volumes
and highlight the volume (ZFS pool) to upgrade. Click the
Upgrade button as shown in
Figure 2.5.5.
Note
If the Upgrade button does not appear, the pool is already at the latest feature flags and does not need to be upgraded.
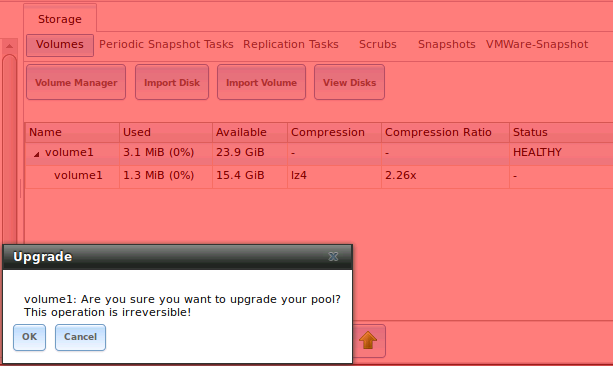
Fig. 2.5.5 Upgrading a ZFS Pool
The warning reminds you that a pool upgrade is irreversible. Click OK to proceed with the upgrade.
The upgrade itself only takes a few seconds and is non-disruptive. It is not necessary to stop any sharing services to upgrade the pool. However, it is best to upgrade when the pool is not being heavily used. The upgrade process will suspend I/O for a short period, but is nearly instantaneous on a quiet pool.
2.6. Virtualization
FreeNAS® can be run inside a virtual environment for development, experimentation, and educational purposes. Please note that running FreeNAS® in production as a virtual machine is not recommended. If you decide to use FreeNAS® within a virtual environment, read this post first as it contains useful guidelines for minimizing the risk of losing data.
To install or run FreeNAS® within a virtual environment, create a virtual machine that meets these minimum requirements:
- at least 8192 MB (8 GB) base memory size
- a virtual disk at least 8 GB in size to hold the operating system and boot environments
- at least one additional virtual disk at least 4 GB in size to be used as data storage
- a bridged network adapter
This section demonstrates how to create and access a virtual machine within VirtualBox and VMware ESXi environments.
2.6.1. VirtualBox
VirtualBox
is an open source virtualization program originally created by Sun
Microsystems. VirtualBox runs on Windows, BSD, Linux, Macintosh, and
OpenSolaris. It can be configured to use a downloaded FreeNAS®
.iso file, and makes a good testing environment for practicing
configurations or learning how to use the features provided by
FreeNAS®.
To create the virtual machine, start VirtualBox and click the New button, shown in Figure 2.6.1, to start the new virtual machine wizard.
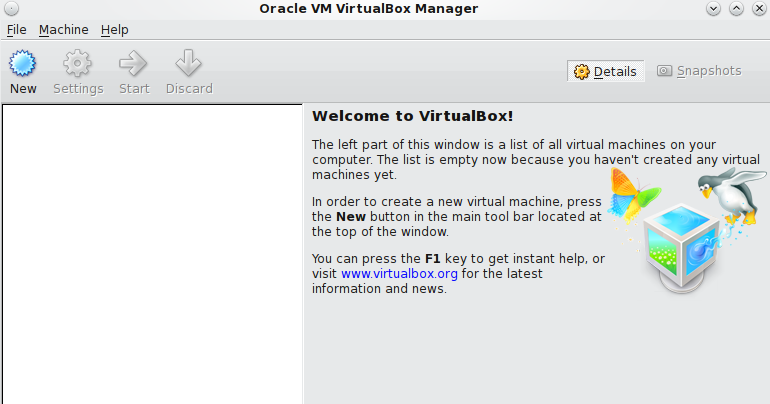
Fig. 2.6.1 Initial VirtualBox Screen
Click the Next button to see the screen in Figure 2.6.2. Enter a name for the virtual machine, click the Operating System drop-down menu and select BSD, and select FreeBSD (64-bit) from the Version dropdown.
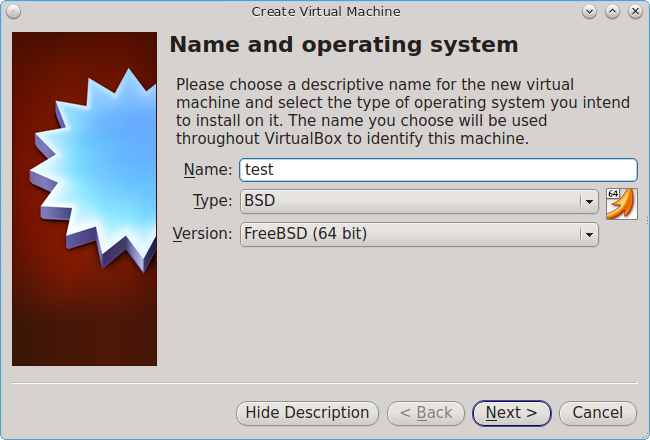
Fig. 2.6.2 Type in a Name and Select the Operating System for the New Virtual Machine
Click Next to see the screen in Figure 2.6.3. The base memory size must be changed to at least 8192 MB. When finished, click Next to see the screen in Figure 2.6.4.
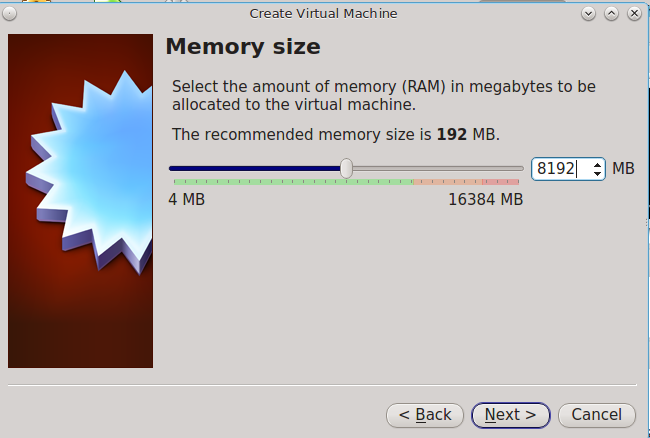
Fig. 2.6.3 Select the Amount of Memory Reserved for the Virtual Machine
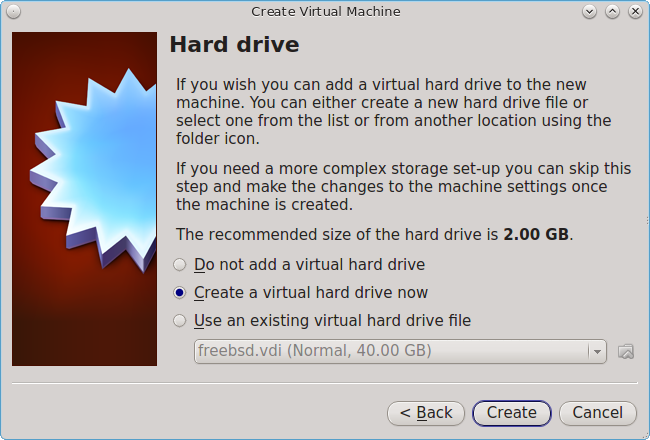
Fig. 2.6.4 Select Existing or Create a New Virtual Hard Drive
Click Create to launch the Create Virtual Hard Drive Wizard shown in Figure 2.6.5.
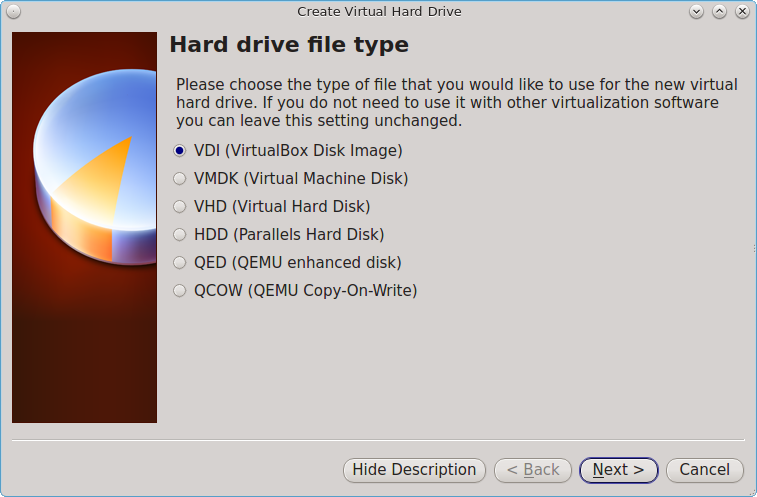
Fig. 2.6.5 Create New Virtual Hard Drive Wizard
Select VDI and click the Next button to see the screen in Figure 2.6.6.
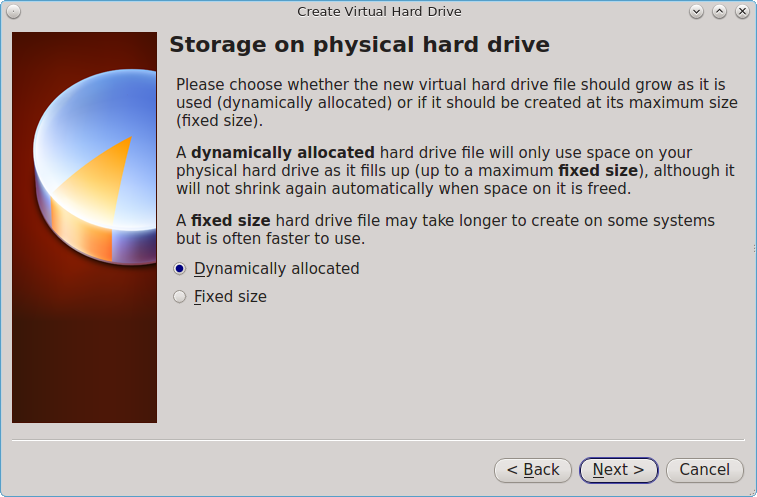
Fig. 2.6.6 Select Storage Type for Virtual Disk
Choose either Dynamically allocated or Fixed-size storage. The first option uses disk space as needed until it reaches the maximum size that is set in the next screen. The second option creates a disk the full amount of disk space, whether it is used or not. Choose the first option to conserve disk space; otherwise, choose the second option, as it allows VirtualBox to run slightly faster. After selecting Next, the screen in Figure 2.6.7 is shown.
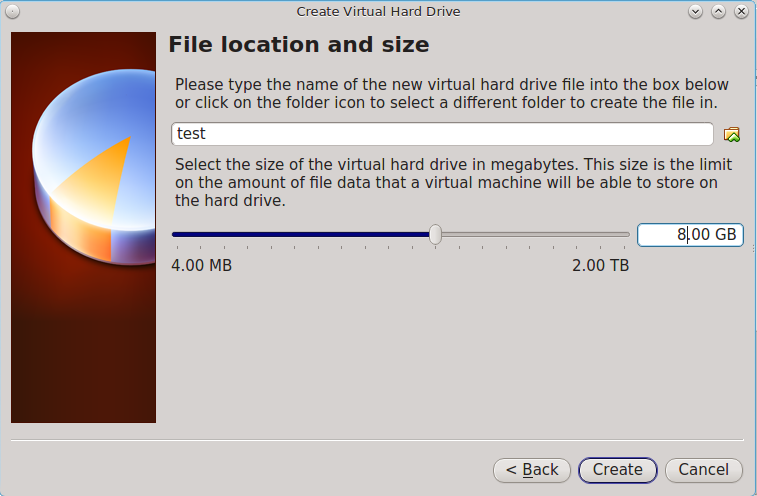
Fig. 2.6.7 Select File Name and Size of Virtual Disk
This screen is used to set the size (or upper limit) of the virtual disk. Increase the default size to 8 GB. Use the folder icon to browse to a directory on disk with sufficient space to hold the virtual disk files. Remember that there will be a system disk of at least 8 GB and at least one data storage disk of at least 4 GB.
After making a selection and pressing Next, a summary of the configuration options chosen is shown. Use the Back button to return to a previous screen if any values need to be modified. Otherwise, click Finish to complete the wizard. The new virtual machine is listed in the left frame, as shown in the example in Figure 2.6.8.
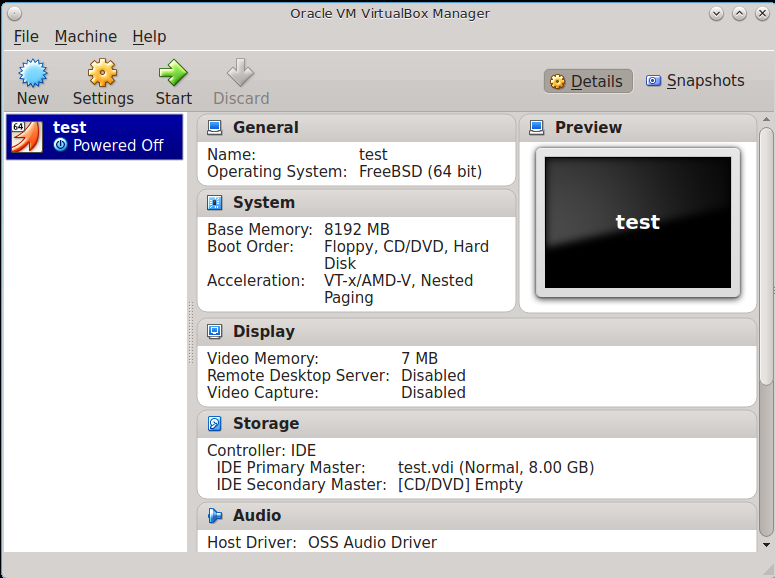
Fig. 2.6.8 The New Virtual Machine
Create the virtual disks to be used for storage. Click the Storage hyperlink in the right frame to access the storage screen seen in Figure 2.6.9.
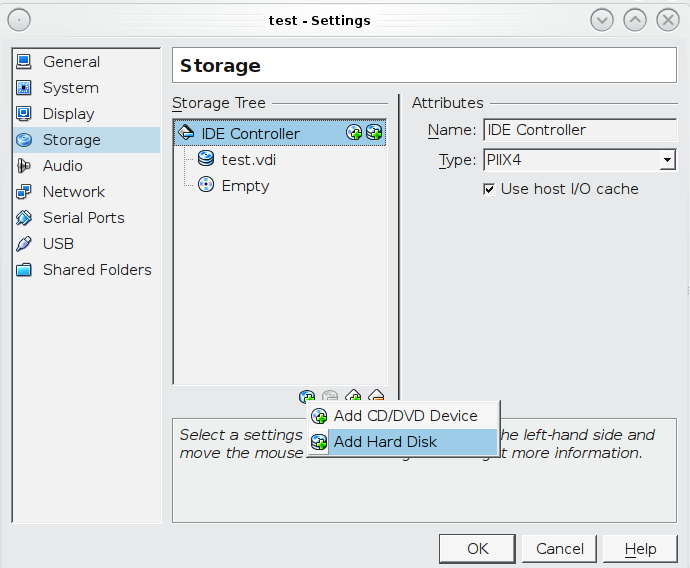
Fig. 2.6.9 Storage Settings of the Virtual Machine
Click the Add Attachment button, select Add Hard Disk from the pop-up menu, then click the Create New Disk button. This launches the Create New Virtual Hard Drive Wizard (seen in Figure 2.6.5 and 2.6.6). This disk will be used for storage, so create a size appropriate to your needs, making sure that it is at least 4 GB. To practice with RAID configurations, create as many virtual disks as needed. Two disks can be created on each IDE controller. For additional disks, click the Add Controller button to create another controller for attaching additional disks.
Create a device for the installation media. Highlight the word “Empty”, then click the CD icon as shown in Figure 2.6.10.
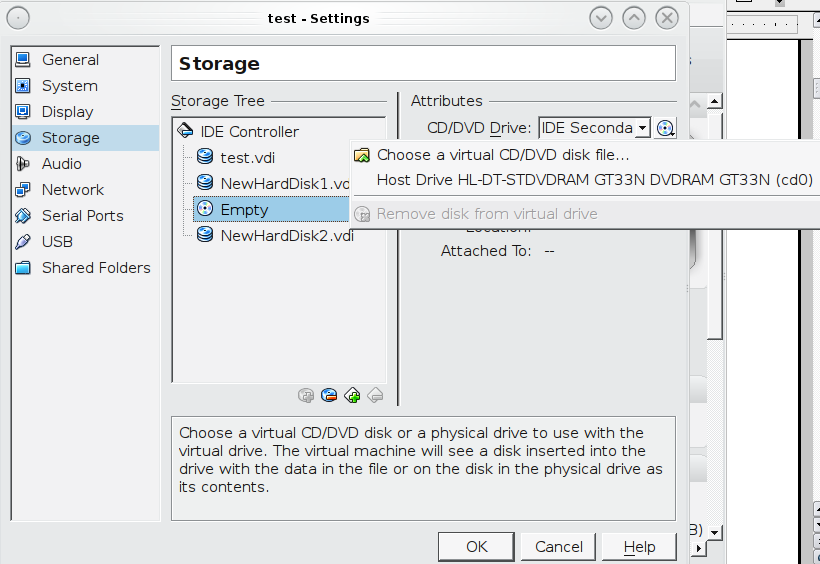
Fig. 2.6.10 Configuring ISO Installation Media
Click Choose a virtual CD/DVD disk file... to browse to
the location of the .iso file. If the .iso was burned
to CD, select the detected Host Drive.
Depending on the extensions available in the host CPU, it might not be
possible to boot the VM from .iso. If
“your CPU does not support long mode” is shown when trying to boot
the .iso, the host CPU either does not have the required
extension or AMD-V/VT-x is disabled in the system BIOS.
Note
If you receive a kernel panic when booting into the ISO, stop the virtual machine. Then, go to System and check the box Enable IO APIC.
To configure the network adapter, go to
Settings → Network.
In the Attached to drop-down menu select
Bridged Adapter, then choose the name of the physical
interface from the Name drop-down menu. In the example
shown in
Figure 2.6.11,
the Intel Pro/1000 Ethernet card is attached to the network and has a
device name of em0.
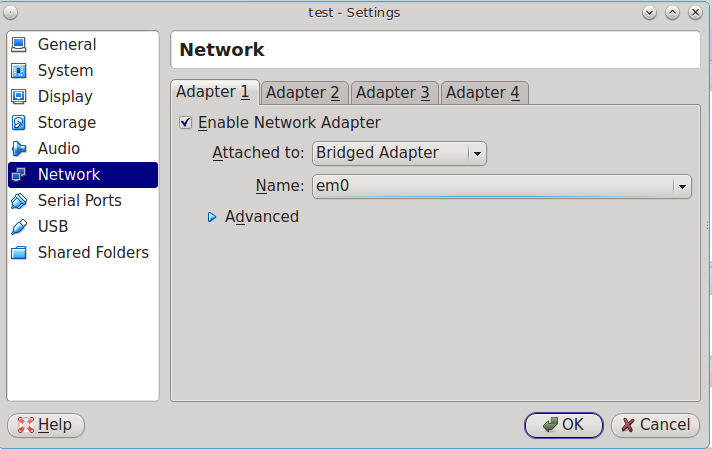
Fig. 2.6.11 Configuring a Bridged Adapter in VirtualBox
After configuration is complete, click the Start arrow and
install FreeNAS® as described in Performing the Installation. Once
FreeNAS® is installed, press F12 when the VM starts to boot to
access the boot menu. Select the primary hard disk as the boot option.
You can permanently boot from disk by removing the CD/DVD
device in Storage or by unchecking CD/DVD-ROM
in the Boot Order section of System.
2.6.2. VMware ESXi
Before using ESXi, read this post for an explanation of why iSCSI will be faster than NFS.
ESXi is is a bare-metal hypervisor architecture created by VMware Inc. Commercial and free versions of the VMware vSphere Hypervisor operating system (ESXi) are available from the VMware website. After the operating system is installed on supported hardware, use a web browser to connect to its IP address. The welcome screen provides a link to download the VMware vSphere client which is used to create and manage virtual machines.
Once the VMware vSphere client is installed, use it to connect to the
ESXi server. To create a new virtual machine, click
File → New → Virtual Machine.
The New Virtual Machine Wizard will launch as shown in
Figure 2.6.12.
Fig. 2.6.12 New Virtual Machine Wizard
Click Next and enter a name for the virtual machine. Click Next and highlight a datastore. An example is shown in Figure 2.6.13. Click Next. In the screen shown in Figure 2.6.14, click Other, then select a FreeBSD 64-bit architecture.
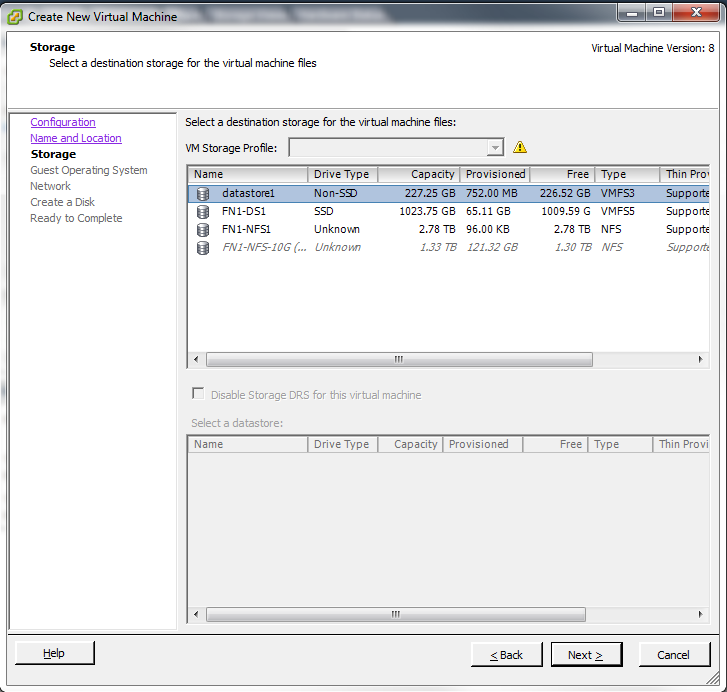
Fig. 2.6.13 Select Datastore
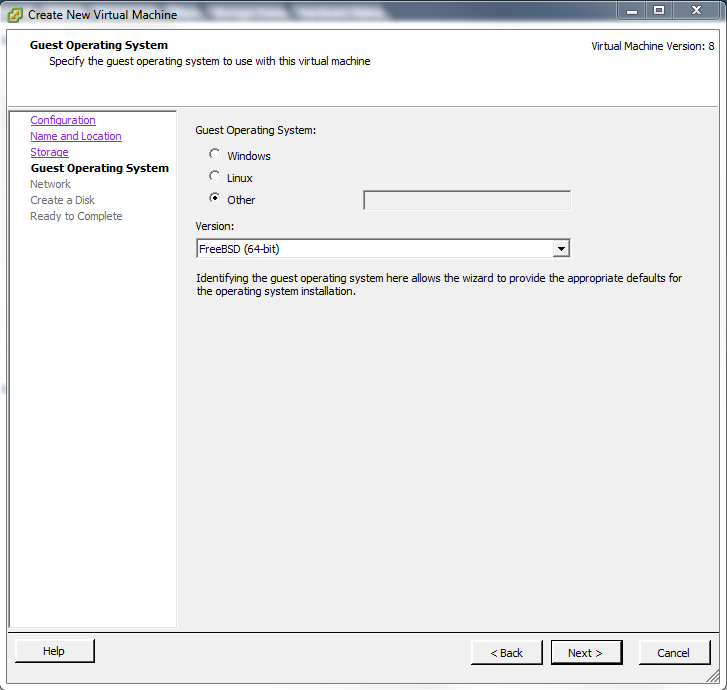
Fig. 2.6.14 Select Operating System
Click Next and create a virtual disk file of 8 GB to hold the FreeNAS® operating system, as shown in Figure 2.6.15.
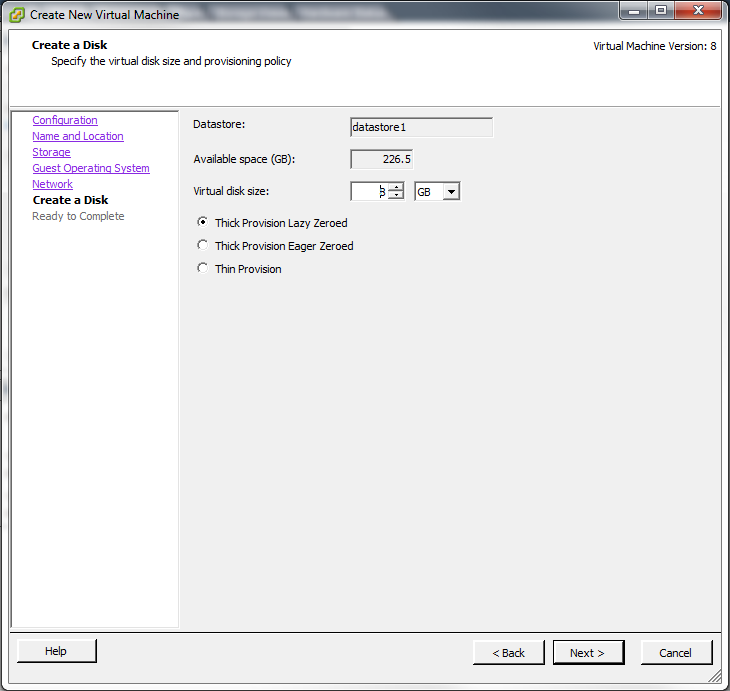
Fig. 2.6.15 Create Disk for the Operating System
Click Next and Finish. The new virtual machine is listed in the left frame. Right-click the virtual machine and select Edit Settings to access the screen shown in Figure 2.6.16.
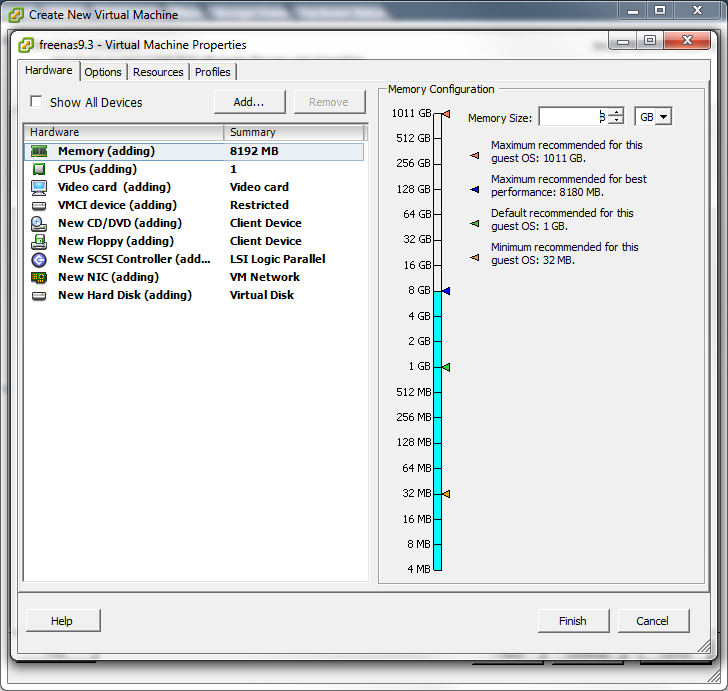
Fig. 2.6.16 Virtual Machine Settings
Increase the Memory Configuration to at least 8192 MB.
To create a storage disk,
click Hard disk 1 → Add.
In the Device Type menu, highlight Hard Disk
and click Next. Select
Create a new virtual disk and click Next. In
the screen shown in
Figure 2.6.17,
select the size of the disk. To dynamically allocate space as needed,
check the box
Allocate and commit space on demand (Thin Provisioning).
Click Next, then Next, then Finish
to create the disk. Repeat to create the amount of storage disks
needed to meet your requirements.
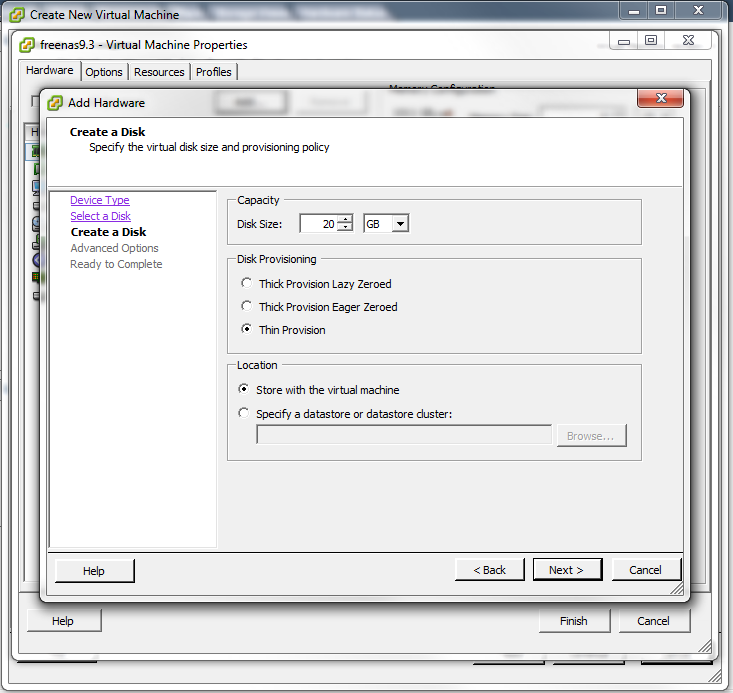
Fig. 2.6.17 Creating a Storage Disk
For ESX 5.0, Workstation 8.0, or Fusion 4.0 or higher, additional configuration is needed so that the virtual HPET setting does not prevent the virtual machine from booting.
If you are running ESX, while in Edit Settings, click
Options → Advanced → General
→ Configuration Parameters
.
Change hpet0.present from true to false, then click
OK twice to save the setting.
For Workstation or Player, while in Edit Settings,
click Options → Advanced → File Locations.
Locate the path for the Configuration file named filename.vmx.
Open that file in a text editor, change hpet0.present from
true to false, and save the change.