3. Booting
The Console Setup menu, shown in Figure 3.1, appears at the end of the boot process. If the FreeNAS® system has a keyboard and monitor, this Console Setup menu can be used to administer the system.
Note
The Console Setup menu can be accessed from within the
FreeNAS® GUI by typing /etc/netcli from Shell.
The Console Setup menu can be disabled by unchecking the
Enable Console Menu in
System → Settings → Advanced.
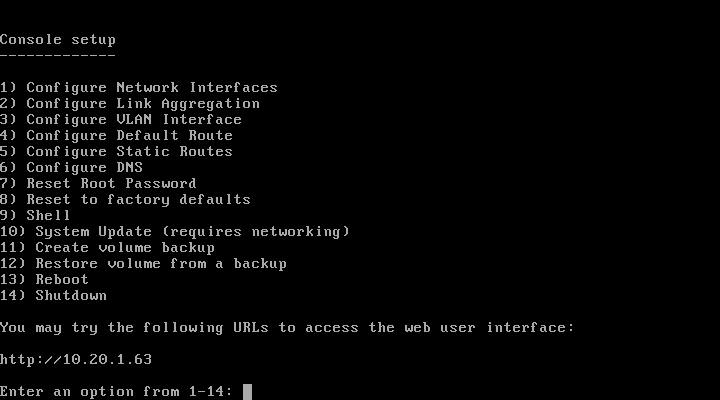
Fig. 3.1 Console Setup Menu
The menu provides these options:
1) Configure Network Interfaces: provides a configuration wizard to configure the system’s network interfaces.
2) Configure Link Aggregation: allows creating a new link aggregation or deleting an existing link aggregation.
3) Configure VLAN Interface: is used to create or delete a VLAN interface.
4) Configure Default Route: is used to set the IPv4 or IPv6 default gateway. When prompted, enter the IP address of the default gateway.
5) Configure Static Routes: prompts for the destination network and gateway IP address. Re-enter this option for each route needed.
6) Configure DNS: prompts for the name of the DNS domain and the
IP address of the first DNS server. When adding multiple DNS servers,
press Enter to enter the next one. Press Enter twice to
leave this option.
7) Reset Root Password: if you are unable to log in to the graphical administrative interface, select this option and follow the prompts to set the root password.
8) Reset to factory defaults: to delete all of the
configuration changes made in the administrative GUI, select this
option. Once the configuration is reset, the system will reboot. It
will be necessary to use
Storage → Volumes → Import Volume to re-import
any volumes.
9) Shell: starts a shell for running FreeBSD commands. To leave the shell, type exit.
10) System Update: checks for system updates. If any new updates are available, they are automatically be downloaded and applied. This is a simplified version of the Update option available in the web interface. Updates are applied immediately for the currently selected train and access to the GUI is not required. For more advanced update options like switching trains, use Update.
11) Create volume backup: backs up the FreeNAS® configuration and
ZFS layout, and, optionally, the data, to a remote system over an
encrypted connection. The remote system must have sufficient space to
hold the backup and be running an SSH server on port 22. The remote
system does not have to be formatted with ZFS, as the backup will be
saved as a binary file. When this option is selected, it prompts for
the hostname or IP address of the remote system, the name of a user
account on that system, the user account password, the full path to a
directory on the remote system to save the backup, whether to also
back up all of the data, whether to compress the data, and a
confirmation to save the values. y starts the backup, n repeats
the configuration, and q quits the backup wizard. If the password is
left empty, key-based authentication is used instead. This requires
that the public key of the root user has been stored in
~root/.ssh/authorized_keys on the remote system and that
they key is not protected by a passphrase. Refer to
Rsync over SSH Mode for instructions on generating a key pair.
12) Restore volume from a backup: restores from an existing backup
created with 11) Create volume backup or
System → Advanced → Backup. It prompts for the
hostname or IP address of the remote system holding the backup, the
username that was used, the password (leave empty if key-based
authentication was used), the full path of the remote directory
storing the backup, and a confirmation that the values are correct.
y starts the restore, n repeats the configuration, and q quits
the restore wizard. The restore indicates if it can log into the
remote system, find the backup, and whether the backup contains data.
It then prompts to restore FreeNAS® from that backup. Note that if y
is pressed to perform the restore, the system will be returned to the
database configuration, ZFS layout, and optionally the data, at the
point in time when the backup was created. The system reboots after
the restore completes.
Warning
The backup and restore options are meant for disaster recovery. If you restore a system, it is returned to the point in time that the backup was created. If you select the option to save the data, any data created after the backup was made will be lost. If you do not select the option to save the data, the system will be recreated with the same ZFS layout, but with no data.
Warning
The backup function IGNORES ENCRYPTED POOLS. Do not use it to back up systems with encrypted pools.
13) Reboot: reboots the system.
14) Shutdown: halts the system.
3.1. Obtaining an IP Address
During boot, FreeNAS® automatically attempts to connect to a DHCP server from all live network interfaces. If it successfully receives an IP address, the address is displayed so it can be used to access the graphical user interface. The example in Figure 3.1 shows a FreeNAS® system that is accessible at http://192.168.1.119.
Some FreeNAS® systems are set up without a monitor, making it challenging to determine which IP address has been assigned. On networks that support Multicast DNS (mDNS), the hostname and domain can be entered into the address bar of a browser. By default, this value is freenas.local.
If the FreeNAS® server is not connected to a network with a DHCP server, use the console network configuration menu to manually configure the interface as seen in Example: Manually Setting an IP Address from the Console Menu. In this example, the FreeNAS® system has one network interface, em0.
Manually Setting an IP Address from the Console Menu
Enter an option from 1-14: 1
1) em0
Select an interface (q to quit): 1
Reset network configuration (y/n) n
Configure interface for DHCP? (y/n) n
Configure IPv4? (y/n) y
Interface name: (press enter as can be blank)
Several input formats are supported
Example 1 CIDR Notation: 192.168.1.1/24
Example 2 IP and Netmask separate:
IP: 192.168.1.1
Netmask: 255.255.255.0, or /24 or 24
IPv4 Address: 192.168.1.108/24
Saving interface configuration: Ok
Configure IPv6? (y/n) n
Restarting network: ok
You may try the following URLs to access the web user interface:
http://192.168.1.108
After the system has an IP address, enter that address into a graphical web browser from a computer connected to the same network as the FreeNAS® system.
3.2. Logging In
The password for the root user is requested as shown in Figure 3.2.1.
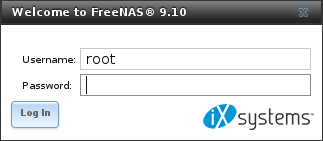
Fig. 3.2.1 Enter the Root Password
Enter the password chosen during the installation. The administrative GUI is displayed as shown in Figure 3.2.2.
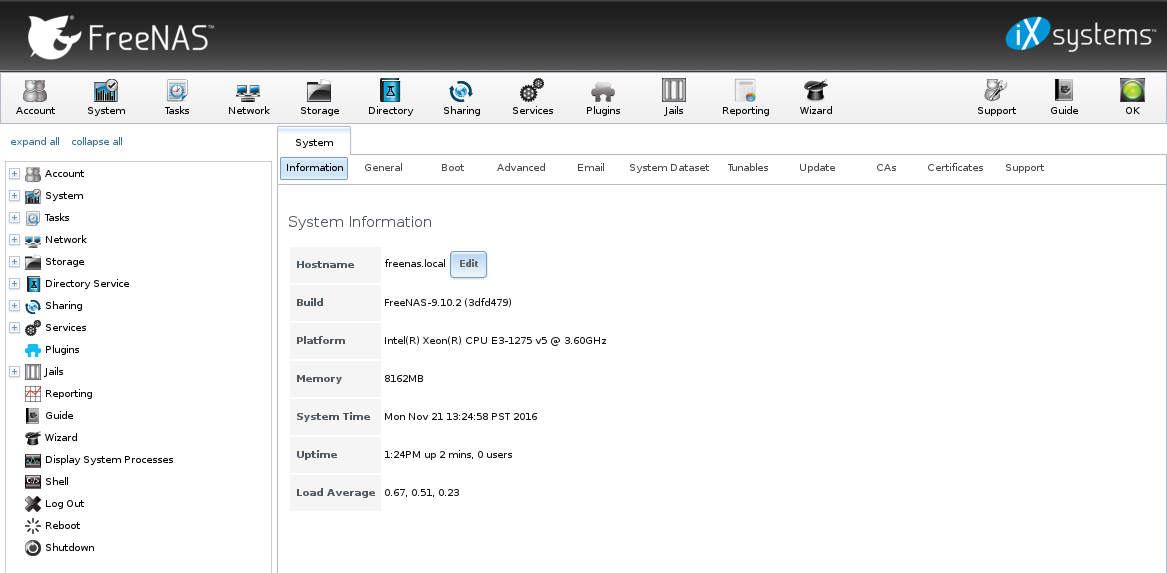
Fig. 3.2.2 FreeNAS® Graphical Configuration Menu
If the FreeNAS® system does not respond to the IP address or mDNS name entered in a browser:
- If proxy settings are enabled in the browser configuration, disable them and try connecting again.
- If the page does not load, check whether the FreeNAS® system’s IP address responds to a ping from another computer on the same network. If the FreeNAS® IP address is in a private IP address range, it can only be accessed from within that private network.
- If the user interface loads but is unresponsive or seems to be missing menu items, try a different web browser. IE9 has known issues and does not display the graphical administrative interface correctly if compatibility mode is turned on. Firefox is recommended.
- If An error occurred! messages are shown when attempting to configure an item in the GUI, make sure that the browser is set to allow cookies from the FreeNAS® system.
This blog post describes some applications which can be used to access the FreeNAS® system from an iPad or iPhone.